
Textract Scenario User Manual
OCR Screen Text Capture Library Extension
License agreement. Redistribution policy
- Scenario Editor and ScenarioExec() function.
- What is Scenario?
- What is window path?
- What is Capture?
- What is Anchor?
- What is Scenario Group?
- How Scenario is being executed.
- Context of Scenario Editor using.
- Getting started with Scenario Editor.
- Scenario Files ordering.
- Scenario Editor user interface.
- Menu commands reference.
- Hot keys reference.
MFC example of Scenario.DLL use
- Context of Scenario.NET using.
- Scenario.NET API.
- Example of C# application that uses Scenario.NET .
About Scenario Extension
Scenario is an extension of Textract SDK that is designed to capture text from Windows XP – Windows 8 screen, under control of another program. Scenario provides extended functionality of Textract by introducing text scenario and consists of Scenario.DLL and Scenario Editor application. Scenario.DLL is a 32-bit Windows dynamic-link library (DLL). It allows easily create a shortcut to Textract and Scenario functions by means of a Windows system tray icon and a system-wide hot key. It also contains a function to execute Scenario or Scenario Group that define text capture context and can be created with Scenario Editor.
Scenario Editor (ScenEdit.EXE) is a standalone Win32 application that allows creating, testing and managing scenario files and groups.
Scenario.DLL with simple API can be called from programs written in C++, Visual Basic, Power Builder or any other DLL-aware language. It can be used as a part of a product that requires text capturing such as the ones to be fed with text from a legacy system. Scenario.DLL offers output into a memory and into a file.
Textract package contains an MFC example that demonstrates using of Scenario concept and features of Scenario.DLL.
License agreement. Redistribution policy
End-User License Agreement.
This End-User License Agreement (EULA) is a legal agreement between you (either an individual or a single entity) and StructuRise for the software accompanying.
The software product and any related documentation is provided “as is”.
The entire risk arising out of use or performance of the software product remains with you.
In no event shall StructuRise or its suppliers be liable for any damages whatsoever (including, without limitation, damages for loss of business profits, business interruption, loss of business information, or any other pecuniary loss arising out of the use of or inability to use this product, even if StructuRise has been advised of the possibility of such damages. Because some states/jurisdictions do not allow the exclusion or limitation of liability for consequential or incidental damages, the above limitation may not apply to you.
If you acquired this product in the United States, this EULA is governed by the laws of the United States. If this product was acquired outside the United States, then local laws may apply.
Textract Trial Edition License Agreement
You are granted the right to use the trial edition of this software, without any time limitation.
You are granted the right to distribute the trial edition of this software, on the following conditions: the distribution package must not be changed and no fee must be charged for this package.
The information, code and executables provided are provided as is. By using this software, you are agreeing to the above terms.
Textract Commercial Edition License Agreement
You are granted the right to use this software on 1 (one) computer in private, government commercial, institutional and any other environment.
For the Pack license, you are granted the right to use this software on computers according to the number of licenses purchased.
You may not distribute the Commercial edition of this software.
You may not reverse engineer, decompile, disassemble and change this software.
The information, code and executables provided are provided as is. By using this software, you are agreeing to the above terms.
Should you have any questions concerning any of the License Agreements or if you desire to contact StructuRise for any reason, please write us or email
Scenario Installation. List of Installed Files.
Installation Directory: Scenario is installed along with Textract into the same folder.
Installed files:
Scenario.DLL – Extension of text capture library in the form of a dynamic link library.
ScenEdit.EXE – Scenario Editor executable.
Development examples & support
Scenario.DOC – Scenario user’s manual. (This document).
Scenario.H – C/C++ header file, with API for Scenario.DLL.
Scenario.LIB – Library for C/C++ linker to link to Scenario.DLL.
Examples\Bin\ScenarioTest,exe – Compiled example of DLL use, based on MFC.
Examples\Src\ScenarioTest – Source folder for the example.
Introducing Textract Scenario
Scenario Editor and ScenarioExec() function.
Scenario is the extension to the basic Textract API. Technically, Scenario is represented by Scenario Editor and ScenarioExec() function. Scenario Editor is a GUI program that you use to form a kind of prescriptions, named Scenarios and Scenario Groups, for the ScenarioExec() function.
Basic Textract text capture library is presented by Textract API (Textract.DLL, TxtrOCX.dll OCX) and it operates with screen through window handles (HWND) or absolute coordinates. Thus any changes in window position such as its movement, resizing, and application reopening can mislead Textract to capture improper area. Basic Textract API requires thorough support from the program that uses it.
Capture: Thus we introduce capture as a description of window search method that is not based on HWND window handle or rectangle position on the screen. Rectangular Capture is specified (visually, using mouse, from within Scenario Editor) when application intended for text capturing is at real work. Application window can be placed in various ways on a desktop and capture follows these changes. It is tightly coupled with application window. Capture options are manyfold to provide capturing that is independent of window placement, to take into account application reopening, window maximization, movement of splitters, MDI and child windows.
Capture search function is based on analysis of tree of windows (HWND) so that it is possible to use strict comparison of window’s title and class name as well as use regular expression as a template for window’s title and class name. Also it can be specified for search function to skip some windows in the tree hierarchy or not use window’s title or class name in searching process.
Anchor: Another problem that can be solved using scenario is a false capture. It is possible the situation when several places (including incorrect ones) on the screen meet capture specifications, if search criteria is too soft. To prevent such an incorrect capture the anchor is introduced. Anchor is a visual screen element (bitmap) that must be present on screen to allow scenario to be executed. It can be a toolbar button, an icon or some other window element.
Scenario: From the point of view of an application that uses Textract, one screen capture has to return several strings of captured text. Thus the scenario is introduced. Scenario includes one or more captures specified for several rectangles on the screen. Scenario is designed as the entity to use in your application. The main Textract Scenario function ScenarioExec() receives one or more scenarios and returns an array of named strings.
Terminal windows and Regexes: In some cases application needs substrings of a large captured text and it is not possible to predict a placement of these substrings in terms of rectangles inside windows. Typical example is a capture of terminal session from the terminal window. The most appropriate solution for this case would be to capture the whole terminal window content and then to extract required substrings. To fulfill substring extraction regular expressions can be utilized. Regular expressions are widely known among programmers and can be a satisfactory solution in most cases. Another approach is a text analysis by string functions (strstr(), etc.) or using Yacc-like grammar tools. Any of these approaches can be implemented in your application but Textract Scenario supports regular expressions only. To use other text-parsing tool you should capture all the text and then analyze it in your application. It is recommended to try to use regular expressions provided by scenarios. It can be the most simple, straightforward and quick solution.
Scenario Type: Lets consider a situation when your application has to support several third-party applications that are sources for a text capturing. For example, one of these applications can be a terminal window, another one is a dialog window and one more is a MDI application. On the other hand, all you need to get from them are several strings, for example, client name, client ID and some related fields (address, amount, diagnosis, comment?). Thus we introduce scenario type that provides results that are independent of text source application. Scenario of some scenario type guarantees that ScenarioExec() returns expected strings defined for this scenario type. For example, all scenarios of type “ClientAddress” return client name and address strings and your application shouldn’t care about the specific scenario in use. The only requirement is that scenario has to be of specified scenario type.
New scenarios can be created using Scenario Editor after your application is ready and even deployed. Then new scenario can be assigned to your application. No recompilation of your application is required.
The Role of Technician. Beside the end user and programmer scenarios scheme admit another role to be involved in the process, the role of technician. The idea is that technician, who is not a programmer, could create new scenarios, which can be used to capture text from the applications that are not known in advance. We call it technician, while different people can perform this role – somebody who goes to client side for a system installation, an advanced user, your reseller and, of course, the programmer. Thus your application can be unleashed from text source applications, to cover all usage cases, and without extra programming effort. Technician uses Scenario Editor as a tool to bind your application to the new text source.
Scenario Groups can be used to automatically recognize situation on the screen and select appropriate scenario type. Let us assume that user activates your application using hot key or system tray icon (this functionality is provided by HotIcon class from Scenario extension) when he/she decides that there is appropriate situation on the screen. For example, teller can activate cash dispensing or activate the workday summation, both being activated by the same hot key. The task of your application is to determinate the action depending on the screen content. Textract Scenario provides the capability to solve this task. Several scenarios of different scenario types are combined into scenario group. In this case your application pass the scenario group to ScenarioExec() and appropriate scenario will be selected and executed. Type of executed scenario is returned along with captured strings so that your application can decide the action upon the captured text.
What is Scenario?
Scenario defines text capture context and can be created with Scenario Editor and stored as .tcs file. It consists of a set of captures and anchors that help to identify the required window in the system. Each capture and anchor belongs to a window that has some path in the system.
When Scenario is ready its .tcs file can be passed to scenario execution function in Scenario.DLL – ScenarioExec() – that will search text source window in the system using its path and verifying anchors if any exist and then it will capture text from the rectangles described in the Scenario. Captured text can be stored into a memory or/and the destination file specified in Scenario. One scenario can contain several captures and anchors.
What is window path?
Window path is a list of parent window and its descendants ordered by depth. The application main window is at the top of the list. Each window is defined by its caption and class name. The example of path to a child window of Microsoft Word application shown by Microsoft Visual Studio Spy++ utility is the following:

The same path in Scenario Editor (see below for details about Scenario Editor) is the following:

You can specify by checkboxes what path parameters should be used to search the required window. Finally scenario execution function will search last window in the path marked with checkboxes (either window’s Class Name or Caption should have Use checkbox on to be involved into the search process).
Also it is possible to enter a regular expression as attribute to search. For example, Microsoft Word caption contains name of an opened document so that the caption is different for each document but it always contains text “Microsoft Word”. Thus we can specify regex pattern Microsoft Word to narrow search and find the required window:
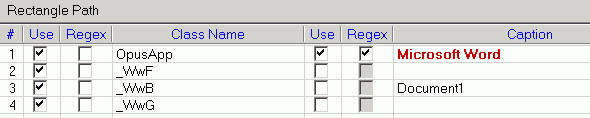
In this case only top-level window that contains text Microsoft Word in the caption will match the search criteria.
What is Capture?
Capture defines rectangular area of window to capture text from. Thus one window can have a several captures but one scenario can contain captures that refer to a different windows. Each capture belongs to a window and is defined by coordinates of the upper-left and lower-right corners or it can refer to the entire window rectangle. Coordinates are relative to the last marked with checkboxes window in the path. Capture’s window is defined by its path in the system as it is described above. For each capture it is possible to specify a regular expression (see below for details about regular expressions using) that will be applied to the captured text.
What is Anchor?
Sometimes window path is not enough to identify the required window unambiguously. In this case a anchors can be used to narrow window search. Anchor is a small image/bitmap of some part of window (window’s graphic element) that helps to identify the required window when window caption and window class name is not unique in the system and is not enough to precisely and unambiguously describe the window. Anchor can be an image of toolbar button, logo bitmap, icon or some other window’s graphic element that is unique for this window. Thus the image and a path to the window it belongs to define the anchor.
What is Scenario Group?
Several scenarios can be combined into a scenario group. To use scenario group put all scenario files (.tcs) into the same directory and in the call to scenario execution function ScenarioExec() specify a path to this folder rather than path to the scenario file. Scenarios in the Group will be executed by the function in alphabetical order. Execution is stopped when some scenario is successfully executed.
How Scenario is being executed.
Beside captures and anchors scenario contains information about the captured text destination and “greediness” of scenario execution algorithm. Captured text destination can be a memory or/and a text file.
Text scenario is executed by ScenarioExec() function defined in Scenario.h file. Typical use of scenario execution function looks like the following:
///////////////////////////////////////////////////
// C++ example
Scenario scen( szScenPath );
if (scen.Status != txsOK)
return;
…
////////////////////////////////////////////////////
// C example
ScenarioResults scenRes;
ScenarioStatus status;
status = ScenarioExec( &scenRes, scenPath );
if (scen.Status == txsOK)
{
…
}
// !!!!!!!!!!!!!!!!!!!!!!!!!!!!!!!!!!!!!!!
// !!! Must be called to free memory !!!
// !!!!!!!!!!!!!!!!!!!!!!!!!!!!!!!!!!!!!!!
ScenarioFree( &scenRes );
/////////////////////////////////////////////////////////
Parameter scenPath can be either a path to .tcs file or path to scenario group that is a folder with .tcs files. In the second case scenarios will be executed by function in alphabetical order. When appropriate scenario is found, i.e. when some text is captured, execution of scenario group is stopped and success code is returned.
When scenario is being executed the algorithm at first is looking for the specified anchors. If any of specified anchors is not found the scenario execution stopped and error txsScenAnchorNotFound is returned or next scenario in the group is executed (if scenPath is a path to folder, i.e. path to scenario group).
After checking anchors the algorithm starts to search defined captures using window caption and class name. Window path can be searched in different ways depending on how it was defined (see below). If scenario mode was defined as Greedy then algorithm will try to capture a text from all defined in scenario captures. If scenario’s mode is Strict then execution will stop if any of scenario capture is not found and error code txsScenRectNotFound will be returned or next scenario in the group is executed.
Writing results to a file.
When scenario results output file is specified the following information is written to the file:
If no regex is specidfied:
StringName1=CapturedText
If regex has N groups:
StringName1=Regex Group1 of CapturedText
StringName2=Regex Group2 of CapturedText
. . .
StringNameN=Regex GroupN of CapturedText
Scenario Editor
Context of Scenario Editor using.
Scenario Editor (ScenEdit.EXE) is a standalone Win32 application that allows creating, testing and managing scenario files and groups. Scenario consists of a set of captures and anchors that help to identify the required window in the system. Each rectangle and anchor belongs to a window that has some path in the system. Later a path to scenario or scenario group can be passed to scenario execution function ScenarioExec() that will capture text according to the captures defined in the scenario.
Getting started with Scenario Editor.
- Create new scenario group (folder) that will contain scenario files (*.tcs) using menu command File New Scenario Group.
- Select created scenario group in the left pane and create new scenario using menu command File New Scenario. New Scenario will appear in the right pane. You can rename it to reflect its purpose.
- Select created scenario in the left pane and create new captures and anchors if required using menu command File New Capture and File New Anchor. These commands will hide Scenario Editor and bring the following dialog:
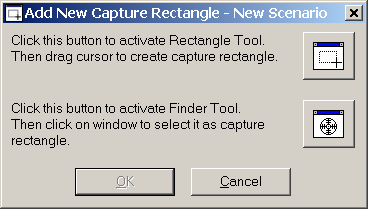
There are two ways to create a new capture:
- To create capture that covers part of a window activate Rectangle Tool (press upper button) and draw the rectangle by dragging cursor (holding the left button pressed). If rectangle overlaps several windows then the most upper window in the path (up to the main application window) will be used as rectangle’s parent window.
- To create capture that refers to the entire window activate Finder Tool (press bottom button) and point out the desired window. When you move cursor with Finder Tool over a window it is highlighted.
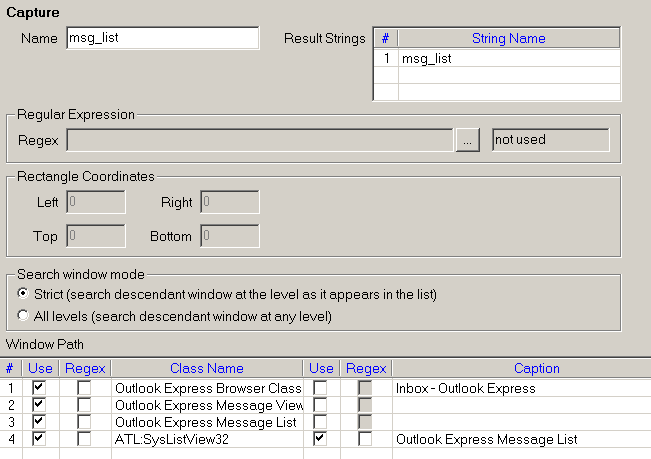
As soon as new capture is created it is available for editing. It is possible to specify its name, edit rectangle’s coordinates (if it was created with Rectangle Tool), enter regular expression for a captured text and define how to search capture’s window using window path parameters.
- When captures and anchors are ready you can test scenario using menu command File Execute Scenario or pressing Ctrl+F5 or clicking on a HotIcon
 installed by Scenario Editor in the system tray.
Scenario Files ordering.
To manage alphabetical order of Scenario files their names are formed by Scenario Editor as the following:
DDScenarioName.tcs
where
DD – is a scenario number in the group.
ScenarioName – is name of scenario displayed in Scenario Editor.
.tcs – is an extension of Text Scenario files
The leading digits are not shown in the Scenario Editor but can be used to manage scenario files by some script.
Scenario Editor user interface.
Scenario Editor consists of two main panes, wizard pane with scenario creation instructions and mini-help pane that contains details about the program’s user interface elements.
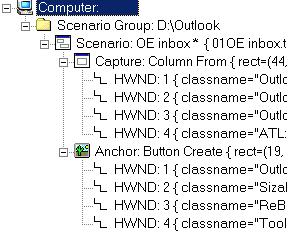
Left pane contain scenario tree that displays all scenario groups and scenario files and their structure:
Right pane contains properties of currently selected in the left pane item:
|
Selected item |
Right pane content |
|
Computer |
List of all scenario groups on this computer.
The following information is shown:
|
|
Scenario group |
List of all scenarios in the group.
The following information is shown:
|
|
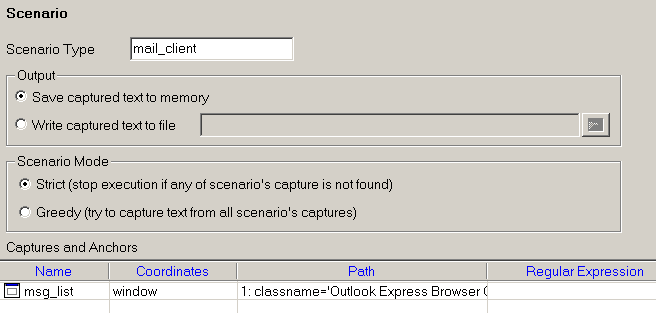
Scenario |
Scenario properties:
Scenario type can be used to identify scenario at run-time. This field is optional. Output group defines captured text destination.
Scenario Mode group defines “greediness” of scenario execution algorithm.
Captures and Anchors table lists all the defined captures and anchors. The following information is shown:
|
|
Capture |
Capture properties:
Name edit box allows specifying capture name. Result Strings table allows specifying result string names. Result strings are named as following:
Rectangle Coordinates group allows editing rectangle coordinates.
Regular Expression group allows specifying regex to be applied to the captured text. Regex edit box displays regex pattern. It is followed by regex status box.
!!! Use group brackets {} in regex pattern to divide captured text into lines. !!! !!! At least one match group must be specified. !!!
Search window mode group allows to specify how to search source window:
Window Path table allows editing window path parameters to be used. |
|
Anchor |
Anchor properties:
|
|
HWND |
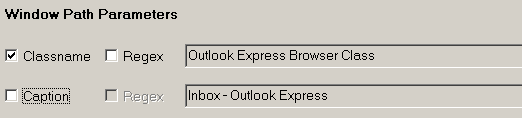
Window path parameters:
This properties pane allows individually edit selected path element. You can specify by checkboxes whether path parameters should be used in search of the required window. It is possible to specify regex for a window class or caption. In that case window will match if specified regex matches window class or caption. For example, if window caption contains document name than window title will be different for each document. Thus to find such a window by caption it is necessary to specify regex. Example: window caption is “Untitled-Notepad”. Since for all documents there is a common part “Notepad” than it is necessary to specify regex pattern Notepad for this window. |


Menu commands reference.
Scenario Editor menu contains the following commands:
|
Menu Command |
Action |
|
File |
|
|
New Scenario Group… |
Create new scenario group (folder). Available when root item Computer is select in the left pane. |
|
New Scenario… |
Create new scenario (.tcs file) in the selected scenario group. Available when Scenario Group is selected in the left pane. |
|
New Capture… |
Create new capture in the selected scenario. Available when scenario is selected in the left pane. |
|
New Anchor… |
Create new anchor in the selected scenario. Available when scenario is selected in the left pane. |
|
Build Font Pattern Database… |
Build font pattern database. This command can be useful if font pattern database was not built on installation or new fonts have been installed. |
|
Execute Scenario (Ctrl+F5) |
Execute selected scenario or scenario group depending on the current selection in the left pane. |
|
Save (Ctrl+S) |
Save selected scenario. |
|
Save All |
Save all scenarios. |
|
Exit |
Exit the application. |
|
Edit |
|
|
Move Up Move Down |
Move the selected scenario up/down in the scenario group or move the selected capture up/down in the scenario. Scenarios are executed in the same order as they are listed in the scenario group. Captured text strings have the same order as captures in the scenario. Available when scenario or capture is selected in the left pane. |
|
Delete |
Delete selected item(s). |
|
View |
|
|
Go Forward Go Back |
Allow navigating in scenario tree in the left pane. Each navigation location is defined by the selected item and tree items state – expanded/collapsed. |
|
Toolbar |
Show/hide toolbar. |
|
Help Pane |
Show/hide mini-help pane. |
|
Wizard Pane |
Show/hide wizard pane. |
|
Help |
|
|
Scenario Editor Help (F1) |
Open Scenario Editor context help |
|
About Scenario Editor… |
Display About Scenario Editor dialog |
Hot keys reference.
Scenario Editor has the following hot keys:
|
Shortcut |
Action |
|
Ctrl+Tab |
Switch input focus between panes. |
|
Tab |
In the right pane it selects next control. |
|
Enter |
In the left pane it expands/collapses scenario tree item In the right pane it opens currently selected in the list item (same as double-click on the list item). |
|
Delete |
Delete selected item(s). |
|
Up/Down Arrows |
Move selection to previous/next item. |
|
Ctrl+F5 |
Execute selected scenario or scenario group depending on the current selection in the left pane. |
|
Ctrl+S |
Save current scenario file. |
|
F1 |
Open Scenario Editor context help |
Using Regular Expressions.
Basically, a regular expression (regex) is a pattern describing a certain amount of text. Their name comes from the mathematical theory on which they are based. This first example is actually a perfectly valid regex. It is the most basic pattern, simply matching the literal text regex. A “match” is the piece of text, or sequence of bytes or characters that pattern was found to correspond to by the processing software. Matches are highlighted in blue in this document.
\b[A-Z0-9._%-]+@[A-Z0-9._%-]+\.[A-Z0-9._%-]{2,4}\b is a more complex pattern. It describes a series of letters, digits, dots, percentage signs and underscores, followed by an at sign, followed by another series of letters, digits, dots, percentage signs and underscores, finally followed by a single dot and between two and four letters. In other words: this pattern describes an email address. With the above regular expression pattern, you can search through a text to find email addresses.
Literal Characters
The most basic regular expression consists of a single literal character, e.g.: a. It will match the first occurrence of that character in the string. If the string is Jack is a boy, it will match the a after the J. The fact that this a is in the middle of the word does not matter to the regex engine. If it matters to you, you will need to tell that to the regex engine by using word boundaries.
Similarly, the regex cat will match cat in About cats and dogs. This regular expression consists of a series of three literal characters. This is like saying to the regex engine: find a c, immediately followed by an a, immediately followed by a t.
Note that regex engine is case sensitive.
Special Characters
Because we want to do more than simply search for literal pieces of text, we need to reserve certain characters for special use.There are 11 characters with special meanings: the opening square bracket [, the backslash \, the caret ^, the dollar sign $, the period or dot ., the vertical bar or pipe symbol |, the question mark ?, the asterisk or star *, the plus sign +, the opening round bracket ( and the closing round bracket ). These special characters are called “metacharacters”.
If you want to use any of these characters as a literal in a regex, you need to escape them with a backslash. If you want to match 1+1=2, the correct regex is 1\+1=2. Otherwise, the plus sign will have a special meaning.
Note that 1+1=2, with the backslash omitted, is a valid regex. But it will not match 1+1=2. It would match 111=2 in 123+111=234, due to the special meaning of the plus character.
All other characters should not be escaped with a backslash. That is because the backslash is also a special character. The backslash in combination with a literal character can create a regex token with a special meaning. E.g. \d will match a single digit from 0 to 9.
Non-Printable Characters
You can use special character sequences to put non-printable characters in your regular expression. \t will match a tab character (ASCII 0x09), \r a carriage return (0x0D) and \n a line feed (0x0A). You can include any character in your regular expression if you know its hexadecimal ASCII or ANSI code for the character set that you are working with. In the Latin-1 character set, the copyright symbol is character 0xA9. So to search for the copyright symbol, you can use \xA9. Another way to search for a tab is to use \x09. Note that the leading zero is required.
Regular Expression Syntax.
This table lists the metacharacters understood in Text Scenario:
|
Metacharacter |
Meaning |
|
. |
Matches any single character. |
|
[ ] |
Indicates a character class. Matches any character inside the brackets (for example, [abc] matches “a”, “b”, and “c”). |
|
^ |
If this metacharacter occurs at the start of a character class, it negates the character class. A negated character class matches any character except those inside the brackets (for example, [^abc] matches all characters except “a”, “b”, and “c”). If ^ is at the beginning of the regular expression, it matches the beginning of the input (for example, ^[abc] will only match input that begins with “a”, “b”, or “c”). |
|
– |
In a character class, indicates a range of characters (for example, [0-9] matches any of the digits “0” through “9”). |
|
? |
Indicates that the preceding expression is optional: it matches once or not at all (for example, [0-9][0-9]? matches “2” and “12”). |
|
+ |
Indicates that the preceding expression matches one or more times (for example, [0-9]+ matches “1”, “13”, “666”, and so on). |
|
* |
Indicates that the preceding expression matches zero or more times. |
|
??, +?, *? |
Non-greedy versions of ?, +, and *. These match as little as possible, unlike the greedy versions which match as much as possible. Example: given the input “<abc><def>”, <.*?> matches “<abc>” while <.*> matches “<abc><def>”. |
|
( ) |
Grouping operator. Example: (\d+,)*\d+ matches a list of numbers separated by commas (such as “1” or “1,23,456”). |
|
{ } |
Indicates a match group. |
|
\ |
Escape character: interpret the next character literally (for example, [0-9]+ matches one or more digits, but [0-9]\+ matches a digit followed by a plus character). Also used for abbreviations (such as \a for any alphanumeric character; see table below). If \ is followed by a number n, it matches the nth match group (starting from 0). Example: <{.*?}>.*?</\0> matches “<head>Contents</head>”. Note that in C++ string literals, two backslashes must be used: “\\+”, “\\a”, “<{.*?}>.*?</\\0>”. |
|
$ |
At the end of a regular expression, this character matches the end of the input. Example: [0-9]$ matches a digit at the end of the input. |
|
| |
Alternation operator: separates two expressions, exactly one of which matches (for example, T|the matches “The” or “the”). |
|
! |
Negation operator: the expression following ! does not match the input. Example: a!b matches “a” not followed by “b”. |
NOTE: Regular expressions are case sensitive.
NOTE: For a captured text always use { } brackets to group result and divide it into strings. These strings will be placed into the ScenarioResults structure by ScenarioExec() function.
Abbreviations
Text Scenario can handle abbreviations, such as \d instead of [0-9].
|
Abbreviation |
Matches |
|
\a |
Any alphanumeric character: ([a-zA-Z0-9]) |
|
\b |
White space (blank): ([ \\t]) |
|
\c |
Any alphabetic character: ([a-zA-Z]) |
|
\d |
Any decimal digit: ([0-9]) |
|
\h |
Any hexadecimal digit: ([0-9a-fA-F]) |
|
\n |
Newline: (\r|(\r?\n)) |
|
\q |
A quoted string: (\”[^\”]*\”)|(\'[^\’]*\’) |
|
\w |
A simple word: ([a-zA-Z]+) |
|
\z |
An integer: ([0-9]+) |
The Dot Matches (Almost) Any Character
In regular expressions, the dot or period is one of the most commonly used metacharacters. Unfortunately, it is also the most commonly misused metacharacter.
The dot matches a single character, without caring what that character is. The only exception are newline characters. In all regex flavors in this document the dot will not match a newline character by default. So by default, the dot is short for the negated character class [^\n] (UNIX regex flavors) or [^\r\n] (Windows regex flavors).
Use The Dot Sparingly
The dot is a very powerful regex metacharacter. It allows you to be lazy. Put in a dot, and everything will match just fine when you test the regex on valid data. The problem is that the regex will also match in cases where it should not match. If you are new to regular expressions, some of these cases may not be so obvious at first.
This is illustrated with a simple example. Let’s say we want to match a date in mm/dd/yy format, but we want to leave the user the choice of date separators. The quick solution is \d\d.\d\d.\d\d. Seems fine at first. It will match a date like 02/12/03 just fine. Trouble is: 02512703 is also considered a valid date by this regular expression. In this match, the first dot matched 5, and the second matched 7. Obviously not what we intended.
\d\d[- /.]\d\d[- /.]\d\d is a better solution. This regex allows a dash, space, dot and forward slash as date separators. Remember that the dot is not a metacharacter inside a character class, so we do not need to escape it with a backslash.
This regex is still far from perfect. It matches 99/99/99 as a valid date. [0-1]\d[- /.][0-3]\d[- /.]\d\d is a step ahead, though it will still match 19/39/99. How perfect you want your regex to be depends on what you want to do with it. If you are validating user input, it has to be perfect. If you are parsing data files from a known source that generates its files in the same way every time, our last attempt is probably more than sufficient to parse the data without errors. You can find a better regex to match dates in the example section.
Use Negated Character Sets Instead of the Dot
Suppose you want to match a double-quoted string. Sounds easy. We can have any number of any character between the double quotes, so “.*” seems to do the trick just fine. The dot matches any character, and the star allows the dot to be repeated any number of times, including zero. If you test this regex on Put a “string” between double quotes, it will match “string” just fine. Now go ahead and test it on Houston, we have a problem with “string one” and “string two”. Please respond.
The regex matches “string one” and “string two”. Definitely not what we intended. The reason for this is that the star is greedy.
In the date-matching example, we improved our regex by replacing the dot with a character class. Here, we will do the same. Our original definition of a double-quoted string was faulty. We do not want any number of any character between the quotes. We want any number of characters that are not double quotes or newlines between the quotes. So the proper regex is “[^”\r\n]*”.
Character Classes or Character Sets
With a “character class”, also called “character set”, you can tell the regex engine to match only one out of several characters. Simply place the characters you want to match between square brackets. If you want to match an a or an e, use [ae]. You could use this in gr[ae]y to match either gray or grey. Very useful if you do not know whether the document you are searching through is written in American or British English.
A character class matches only a single character. gr[ae]y will not match graay, graey or any such thing. The order of the characters inside a character class does not matter. The results are identical.
You can use a hyphen inside a character class to specify a range of characters. [0-9] matches a single digit between 0 and 9. You can use more than one range. [0-9a-fA-F] matches a single hexadecimal digit, case insensitively. You can combine ranges and single characters. [0-9a-fxA-FX] matches a hexadecimal digit or the letter X. Again, the order of the characters and the ranges does not matter.
Useful Applications.
Find a word, even if it is misspelled, such as sep[ae]r[ae]te or li[cs]en[cs]e.
Find an identifier in a programming language with [A-Za-z_][A-Za-z_0-9]*.
Find a C-style hexadecimal number with 0[xX][A-Fa-f0-9]+.
Negated Character Classes
Typing a caret after the opening square bracket will negate the character class. The result is that the character class will match any character that is not in the character class. Unlike the dot, negated character classes also match (invisible) line break characters.
It is important to remember that a negated character class still must match a character. g[^u] does not mean: “a g not followed by a u”. It means: “a g followed by a character that is not a u”. It will not match the g in the string dog. It will match the g and the space after the g in dog is not a cat. Indeed: the space will be part of the overall match, because it is the “character that is not a u” that is matched by the negated character class in the above regex. If you want the regex to match the g, and only the g, in both strings, you need to use negative lookahead: q(?!u).
Metacharacters Inside Character Classes
Note that the only special characters or metacharacters inside a character class are the closing bracket (]), the backslash (\), the caret (^) and the hyphen (-). The usual metacharacters are normal characters inside a character class, and do not need to be escaped by a backslash. To search for a star or plus, use [+*]. Your regex will work fine if you escape the regular metacharacters inside a character class, but doing so significantly reduces readability.
To include a backslash as a character without any special meaning inside a character class, you have to escape it with another backslash. [\\x] matches a backslash or an x. The closing bracket (]), the caret (^) and the hyphen (-) can be included by escaping them with a backslash, or by placing them in a position where they do not take on their special meaning. I recommend the latter method, since it improves readability. To include a caret, place it anywhere except right after the opening bracket. [x^] matches an x or a caret. You can put the closing bracket right after the opening bracket, or the negating caret. []x] matches a closing bracket or an x. [^]x] matches any character that is not a closing bracket. The hyphen can be included right after the opening bracket, or right before the closing bracket, or right after the negating caret. Both [-x] and [x-] match an x or a hyphen.
Shorthand Character Classes
Since certain character classes are used often, a series of shorthand character classes are available. \d is short for [0-9].
\w stands for “word character”. It will include [A-Za-z]. Shorthand character classes can be used both inside and outside the square brackets. \s\d matches a whitespace character followed by a digit. [\s\d] matches a single character that is either whitespace or a digit. When applied to 1 + 2 = 3, the former regex will match 2 (space two), while the latter matches 1 (one). [\da-fA-F] matches a hexadecimal digit, and is equivalent to [0-9a-fA-F].
Negated Shorthand Character Classes
The above three shorthands also have negated versions. \D is the same as [^\d], \W is short for [^\w] and \S is the equivalent of [^\s].
Be careful when using the negated shorthands inside square brackets. [\D\S] is not the same as [^\d\s]. The latter will match any character that is not a digit or whitespace. So it will match x, but not 8. The former, however, will match any character that is either not a digit, or is not whitespace. Because a digit is not whitespace, and whitespace is not a digit, [\D\S] will match any character, digit, whitespace or otherwise.
Repeating Character Classes
If you repeat a character class by using the ?, * or + operators, you will repeat the entire character class, and not just the character that it matched. The regex [0-9]+ can match 837 as well as 222.
If you want to repeat the matched character, rather than the class, you will need to use backreferences. ([0-9])\1+ will match 222 but not 837. When applied to the string 833337, it will match 3333 in the middle of this string.
Example of Regular Expressions using.
Matching Whole Lines of Text
Often, you want to match complete lines in a text file rather than just the part of the line that satisfies a certain requirement. To keep this example simple, let’s say we want to match lines containing the word “John”. The regex John makes it easy enough to locate those lines. But the software will only indicate John as the match, not the entire line containing the word.
The solution is fairly simple. To specify that we need an entire line, we will use the caret and dollar sign. The resulting regex is: ^.*John.*$. You can use the same method to expand the match of any regular expression to an entire line, or a block of complete lines. In some cases, such as when using alternation, you will need to group the original regex together using round brackets.
Finding Lines Containing or Not Containing Certain Words
If a line can meet any out of series of requirements, simply use alternation in the regular expression. ^.*\b(one|two|three)\b.*$ matches a complete line of text that contains any of the words “one”, “two” or “three”. The first backreference will contain the word the line actually contains. If it contains more than one of the words, then the last (rightmost) word will be captured into the first backreference. This is because the star is greedy. If we make the first star lazy, like in ^.*?\b(one|two|three)\b.*$, then the backreference will contain the first (leftmost) word.
If a line must satisfy all of multiple requirements, we need to use lookahead. ^(?=.*?\bone\b)(?=.*?\btwo\b)(?=.*?\bthree\b).*$ matches a complete line of text that contains all of the words “one”, “two” and “three”. Again, the anchors must match at the start and end of a line and the dot must not match line breaks. Because of the caret, and the fact that lookahead is zero-width, all of the three lookaheads are attempted at the start of the each line. Each lookahead will match any piece of text on a single line (.*?) followed by one of the words. All three must match successfully for the entire regex to match. Note that instead of words like \bword\b, you can put any regular expression, no matter how complex, inside the lookahead. Finally, .*$ causes the regex to actually match the line, after the lookaheads have determined it meets the requirements.
If your condition is that a line should not contain something, use negative lookahead. ^((?!regexp).)*$ matches a complete line that does not match regexp. Notice that unlike before, when using positive lookahead, I repeated both the negative lookahead and the dot together. For the positive lookahead, we only need to find one location where it can match. But the negative lookahead must be tested at each and every character position in the line. We must test that regexp fails everywhere, not just somewhere.
Finally, you can combine multiple positive and negative requirements as follows: ^(?=.*?\bmust-have\b)(?=.*?\bmandatory\b)((?!avoid|illegal).)*$. When checking multiple positive requirements, the .* at the end of the regular expression full of zero-width assertions made sure that we actually matched something. Since the negative requirement must match the entire line, it is easy to replace the .* with the negative test.
Parsing URL Addresses.
The following Regular Expression can be used to extract parts of a URL:
({[^:/?#]+}:)?(//{[^/?#]*})?{[^?#]*}(?{[^#]*})?(#{.*})?
Applying it to the following text
http://search.microsoft.com/us/Search.asp?qu=atl&boolean=ALL#results
will output the following capturing groups of matches:
0: “http”
1: “search.microsoft.com”
2: “/us/Search.asp”
3: “qu=atl&boolean=ALL”
4: “results”
IP Addresses
Matching an IP address is another good example of a trade-off between regex complexity and exactness. \b\d{1,3}\.\d{1,3}\.\d{1,3}\.\d{1,3}\b will match any IP address just fine, but will also match 999.999.999.999 as if it were a valid IP address. Whether this is a problem depends on the text you intend to apply the regex to. To restrict all 4 numbers in the IP address to 0..255, you can use this complex beast:
\b(25[0-5]|2[0-4][0-9]|[01]?[0-9][0-9]?)\.(25[0-5]|2[0-4][0-9]|[01]?[0-9][0-9]?)\.(25[0-5]|2[0-4][0-9]|[01]?[0-9][0-9]?)\.(25[0-5]|2[0-4][0-9]|[01]?[0-9][0-9]?)\b (everything on a single line). The long regex stores each of the 4 numbers of the IP address into a capturing group. You can use these groups to further process the IP number.
If you don’t need access to the individual numbers, you can shorten the regex with a quantifier to:
\b(?:(?:25[0-5]|2[0-4][0-9]|[01]?[0-9][0-9]?)\.){3}(?:25[0-5]|2[0-4][0-9]|[01]?[0-9][0-9]?)\b.
Similarly, you can shorten the quick regex to \b(?:\d{1,3}\.){3}\d{1,3}\b
Finding email address
So, what is an email address? It looks easy: a string consisting of letters, digits, dashes, underscores, dots and a single at sign. We can easily write the regular expression. Two character classes, repeated once or more, with an at sign in between: [A-Za-z_0-9.\-]+@[A-Za-z_0-9.\-]+. But we need to make our regular expression more stringent. A valid email address requires a top level domain. A top level domain is two or more letters long, and separated from the rest of the email address with a dot:
[A-Za-z_0-9.\-]+@[A-Za-z_0-9.\-]+\.[A-Za-z]+
Matching Floating Point Numbers with a Regular Expression
This example shows you how to build a regular expression that can match any floating point number. Our regex should also match integers, and floating point numbers where the integer part is not given (i.e. zero).
At first thought, the following regex seems to do the trick: [-+]?[0-9]*\.?[0-9]*. This defines a floating point number as an optional sign, followed by an optional series of digits (integer part), followed by an optional dot, followed by another optional series of digits (fraction part).
Spelling out the regex in words makes it obvious: everything in this regular expression is optional. This regular expression will consider a sign by itself or a dot by itself as a valid floating-point number. In fact, it will even consider an empty string as a valid floating-point number. Not escaping the dot is also a common mistake. A dot that is not escaped will match any character, including a dot. If we had not escaped the dot, 4.4 would be considered a floating point number, and 4X4 too.
When creating a regular expression, it is more important to consider what it should not match, than what it should. The above regex will indeed match a proper floating-point number, because the regex engine is greedy. But it will also match many things we do not want, which we have to exclude.
Here is a better attempt: [-+]?([0-9]*\.[0-9]+|[0-9]+). This regular expression will match an optional sign, that is either followed by zero or more digits followed by a dot and one or more digits (a floating point number with optional integer part), or followed by one or more digits (an integer).
This is a far better definition. Any match will include at least one digit, because there is no way around the [0-9]+ part. We have successfully excluded the matches we do not want: those without digits.
We can optimize this regular expression as: [-+]?([0-9]*\.)?[0-9]+.
If you also want to match numbers with exponents, you can use: [-+]?([0-9]*\.)?[0-9]+([eE][-+]?[0-9]+)?. Notice how the entire exponent part is made optional by grouping it together, rather than making each element in the exponent optional.
Regular Expression Matching a Valid Date
(19|20)\d\d[- /.](0[1-9]|1[012])[- /.](0[1-9]|[12][0-9]|3[01]) matches a date in yyyy-mm-dd format from between 1900-01-01 and 2099-12-31, with a choice of four separators. The year is matched by (19|20)\d\d. Alternation is used to allow the first two digits to be 19 or 20. The round brackets are mandatory. If they were omitted, the regex engine would go looking for 19 or the remainder of the regular expression, which matches a date between 2000-01-01 and 2099-12-31. Round brackets are the only way to stop the vertical bar from splitting up the entire regular expression into two options.
The month is matched by 0[1-9]|1[012], again enclosed by round brackets to keep the two options together. By using character classes, the first option matches a number between 01 and 09, and the second matches 10, 11 or 12.
The last part of the regex consists of three options. The first matches the numbers 01 through 09, the second 10 through 29, and the third matches 30 or 31.
Smart use of alternation allows to exclude invalid dates such as 2000-00-00 that could not have been excluded without using alternation. To be really perfectionist, you would have to split up the month into various options to take into account the length of the month. The above regex still matches 2003-02-31, which is not a valid date. Making leading zeros optional could be another enhancement.
Scenario.DLL
Context of Scenario.DLL using.
Scenario.DLL is a 32-bit Windows dynamic-link library (DLL) that provides extended functionality for Textract module.
Example of Scenario.DLL using.
System tray icon and hot key (“Hot icon”) can be installed simply by the creating an instance of ScenarioHotIcon class object. The typical use of ScenarioHotIcon class is the following (taken from ScenarioTestDlg.cpp):
////////////////////////////////////////////////////////////////////////
// Example of TetrextHotIcon using
m_pHotIcon = new ScenarioHotIcon(
OnHotIconNotifyCallback, // callback function
0, // callback parameter
true, // enable tray icon
NULL, // use default icon. Specify here a path to a customized icon.
true, // enable hot key
MOD_CONTROL | MOD_ALT, ‘T’ // use Ctrl+Alt+T combination
);
// set desired tooltip text
m_pHotIcon->SetTooltipText( m_strToolTip );
////////////////////////////////////////////////////////////////////////
where OnHotIconNotifyCallback is defined as following:
////////////////////////////////////////////////////////////////////////
LRESULT CALLBACK OnHotIconNotifyCallback( LONG lEvent, int nParam )
{
// example of implementation:
// just notify about the event
if (lEvent == WM_LBUTTONDOWN || lEvent == WM_RBUTTONDOWN)
AfxMessageBox( “Tray Event Notification” );
else
AfxMessageBox( “HotKey pressed” );
return 1L;
}
////////////////////////////////////////////////////////////////////////
This function is called when user clicks on the tray icon or presses the hot key combination.
The core function to execute scenario is
ScenarioStatus ScenarioExec(
ScenarioResults* results, // pointer to ScenarioResults structure const char* lpszPath, // path to scenario or scenario group
);
Typical code to use this function is following:
/////////////////////////////////////////////////////////
// C++ example
Scenario scen( szScenPath );
if (scen.Status != txsOK)
return;
…
/////////////////////////////////////////////////////////
// C example
ScenarioResults scenRes;
ScenarioStatus status;
status = ScenarioExec( &scenRes, scenPath );
if (scen.Status == txsOK)
{
…
}
// !!!!!!!!!!!!!!!!!!!!!!!!!!!!!!!!!!!!!!!
// !!! Must be called to free memory !!!
// !!!!!!!!!!!!!!!!!!!!!!!!!!!!!!!!!!!!!!!
ScenarioFree( &scenRes );
/////////////////////////////////////////////////////////
Note that ScenarioFree () MUST be called to release memory allocated by ScenarioExec().
API description for each function.
HotIcon class.
The declaration of the ScenarioHotIcon class is following:
///////////////////////////////////////////////////////////////////
class ScenarioHotIcon
{
// Constructor/Destructor
public:
ScenarioHotIcon(
HOTICONCALLBACK pfnOnHotIconCallback = NULL, // pointer to callback //function which will be called on icon notification or hot key activation
int nNotifyParam = 0, // some parameter which will be passed back in //callback function
bool bTrayIcon = true, //’true’ to use system tray icon
const char* szIconPath = NULL, // icon to be shown in the system tray. NULL // to use default icon
bool bHotKey = true, // ‘true’ to use hot key
UINT uModifiers = MOD_CONTROL, // Specifies keys that must be pressed in combination with the key specified by the nVirtKey parameter in order to call pOnScenarioCallback.
// The uModifiers parameter can be a combination of the following values:
// MOD_ALT – Either ALT key must be held down.
// MOD_CONTROL – Either CTRL key must be held down.
// MOD_SHIFT – Either SHIFT key must be held down.
// MOD_WIN – Either WINDOWS key was held down. These keys are labeled with the Microsoft Windows logo.
UINT uVirtKey = ‘T’ ); // Specifies the virtual-key code of the hot key.
~ScenarioHotIcon();
// Operations
public:
// Change the system tray icon
BOOL SetIcon( HICON hIcon );
// Retrieve the system tray icon
HICON GetIcon() const;
// Hide the system tray icon
void HideIcon();
// Show the system tray icon
void ShowIcon();
// Remove the system tray icon
void RemoveIcon();
// Move the system tray icon to the most right position
void MoveToRight();
// Change the Tooltip text for the system tray icon
BOOL SetTooltipText( LPCTSTR pszTooltipText );
// Retrieve the Tooltip text of the system tray icon
CString GetTooltipText() const;
// Change or retrieve the window to send notification messages to
BOOL SetNotificationWnd( CWnd* pNotifyWnd );
CWnd* GetNotificationWnd() const;
};
/////////////////////////////////////////////////////////////////////////
The HOTICONCALLBACK function is an application-defined callback function that processes hot key and tray icon notification messages: WM_LBUTTONDOWN and WM_RBUTTONDOWN.
The following typedef is used to declare it:
////////////////////////////////////////////////////////////////////////
typedef LRESULT (CALLBACK* HOTICONCALLBACK)( LONG, int );
////////////////////////////////////////////////////////////////////////
The HOTICONCALLBACK type defines a pointer to the callback function that is a placeholder for the application-defined function name:
/////////////////////////////////////////////////////////////////////////
LRESULT CALLBACK OnHotIconCallback( LONG lEvent, int nParam )
{
// lEvent is either WM_LBUTTONDOWN or WM_RBUTTONDOWN if came from tray icon
// lEvent is zero if came from hot key
// nParam is the same as was passed in ScenarioHotIcon constructor.
// do required action
. . .
return 1L;
}
/////////////////////////////////////////////////////////////////////////
Plain C API.
The next important part of Scenario DLL is a function to execute Scenario. The function is declared as the following:
////////////////////////////////////////////////////////////////////////
// ScenarioExec()
// This function executes Text Capture Scenarios (*.tcs) prepared by
// Scenario Editor. Parameter scenPath can be a path name of tcs
// file to execute one scenario or path name of directory with several
// scenario files (*.tcs) to execute scenario group in alphabetical order
// of scenario names (scenario name is the name of tcs file).
// Returns ScenarioStatus code
// Arguments:
// results – pointer to ScenarioResults structure that holds
// scenario results.
// scenPath – path name of tcs file to be executed or path name
// of directory with several scenario files (scenario group)
////////////////////////////////////////////////////////////////////////
ScenarioStatus ScenarioExec( ScenarioResults* results, const char* scenPath );
Parameter scenPath can be a path name of tcs file to execute one scenario or path name of directory with several scenarios files (*.tcs) to execute scenario group in alphabetical order of scenario names (scenario name is the name of tcs file).
Parameter results is a pointer to ScenarioResults structure to store scenario results:
// struct ScenarioText to hold captured text and its name
struct ScenarioText {
char* Name; // Name of captured text assigned in Scenario Editor
char* Text; // Captured text
};
// struct ScenarioResults to hold overall results of scenario execution
struct ScenarioResults {
ScenarioStatus Status; // Scenario execution error code
char* Name; // Full path name of executed scenario
char* Type; // Scenario type
int NumTexts; // Size of ScenarioText array with captured texts
ScenarioText* Texts; // ScenarioText array
};
///////////////////////////////////////////////////////////////////////////
ScenarioExec() returns ScenarioStatus code:
////////////////////////////////////////////////////////////////////////
enum ScenarioStatus
{
txsOK = 0, // scenario was successfully executed.
txsGeneralError // returned on unpredicted errors
txsScenFileNotFound, // specified scenario file was not found or could not be opened
txsScenGroupIsEmpty, // specified path is a folder which contains no .tcs files
txsScenIsIncorrect, // scenario file is incorrect
txsNoMatchedScen, // no matched scenario was found – no window matches to the specified in scenario text capture context.
txsScenAnchorNotFound,// anchor was not found
txsScenRectNotFound, // no text capture was found
txsScenWndIsMinimized, // capture’s window is minimized
txsScenRectIsObscured, // capture is obscured by other window
txsOutputFileOpenError, // cannot open specified output file
txsOutputFileWriteError, // error on writing to the output file
////////////////////////////////////////////////////////////////////////
The next function MUST be called to free memory that was allocated in the preceding call to ScenarioExec()
///////////////////////////////////////////////////////////////////////
// ScenarioFree MUST be called to free memory that was
// allocated in the preceding call to ScenarioExec
///////////////////////////////////////////////////////////////////////
ScenarioStatus ScenarioFree( ScenarioResults* results );
////////////////////////////////////////////////////////////////////////
C++ wrapper.
There is a simple C++ wrapper of ScenarioResults that allows using scenario functionality by simple instantiation of Scenario class object:
///////////////////////////////////////////////////////////////////////////
// C++ wrapper for ScenarioResults to simplify its using
class Scenario : public ScenarioResults {
public:
// Constructors
Scenario();
Scenario( const char* scenPath ) {
. . .
Exec( scenPath );
}
// Destructor
~Scenario() {
ScenarioFree( this );
}
// Execute scenario
ScenarioStatus Exec( const char* scenPath ) {
return ScenarioExec( this, scenPath );
}
};
///////////////////////////////////////////////////////////////////////////
Thus the following code does all the required operations:
///////////////////////////////////////////////////////////////////////////
// C++ example
Scenario scen( szScenPath );
if (scen.Status != txsOK)
return;
…
///////////////////////////////////////////////////////////////////////////
Building Font Database.
One of these functions MUST be called once to build font database before using ScenarioExec() function. Usually font database is built at the end of installation process.
////////////////////////////////////////////////////////////////////////
bool FontDatabaseBuild();
bool FontDatabaseBuildWithDialog();
FontDatabaseBuild is a silent version (without user’s interface).
FontDatabaseBuildWithDialog opens the dialog box to ask the user about building the font database, and shows process progress.
NOTE: Do not use directly any function of Textract.DLL once your application is linked to Scenario.DLL! Textract.DLL MUST be initialised only once by the application and it is done internally by Scenario.DLL on loading and terminating.
MFC example of Scenario.DLL use
ScenarioTest MFC example illustrates the using of Scenario functionality. All the most important implementation is located in file ScenarioTestDlg.cpp. This example is also very helpful to evaluate Text Scenario files.
To start example run compiled file ScenarioTest.exe from Examples\Bin folder.
It will install a Windows system tray icon and a system-wide hot key Ctrl+Alt+T. ![]()
Clicking by left/right mouse button on the icon or pressing Ctrl+Alt+T will call function that executes entered scenario or just show a message what event has occurred.
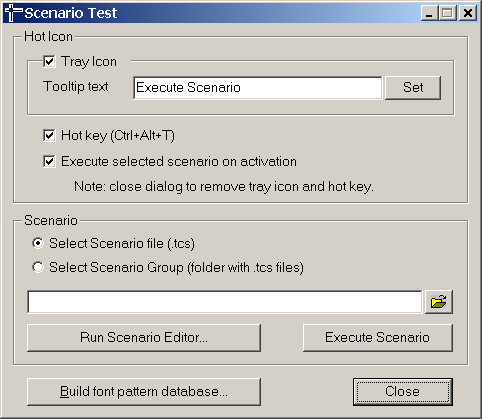
– Uncheck Tray Icon checkbox to remove tray icon.
– Enter Tooltip text and press Set button to set a new tooltip text for the tray icon.
– Uncheck Hot key to remove Ctrl+Alt+T hot key from the system.
– Uncheck Execute selected scenario on activation checkbox to display a message when Hot icon is activated instead of scenario execution.
If font database hasn’t been built yet then click Build font pattern database… button to prepare Textract for text capturing.
Bottom part of the dialog allows to specify scenario file or scenario group and execute it.
Click Run Scenario Editor button to launch Scenario Editor and create scenario files. Then you can specify these files to be executed when Execute scenario button is pressed.
Select scenario file or scenario group mode for a file open button using a radio-button. Depending on the selection it can open File Open dialog to specify .tcs file or Select Scenario Folder dialog.to choose scenario group.
When scenario path is entered you can press Execute scenario button or minimize dialog and click on the Scenario tray icon or press Ctrl+Alt+T to execute specified scenario or scenario group.
If scenario is successfully executed then the captured text will be shown in Notepad window.
Scenario.NET (.NET Framework)
Context of Scenario.NET using.
Scenario.NET is .NET Framework assembly that can be used by any application targeting .NET Framework. It is implemented in ScenarioNET.DLL and provides full access to Scenario’s functionality. Scenario.NET provides an API with similar functionality to the Scenario API. The Scenario.NET API can be called by code written in any managed language: C#, VB, Managed C++, etc.
Scenario.NET API
ScenarioNET assembly exposes two classes NetScenario and NetScenarioText.
Class NetScenarioText is a storage for captured strings. It contains two public data member –
pName – Name of captured text assigned in Scenario Editor
pText – Captured text
Class NetScenario implements all the functionality of Scenario execution. It has the following attributes and methods (using C# notation):
|
Data Members |
|
|
Status |
Contains Scenario execution error code. The Status data member is a public variable of type NetScenarioStatus. |
|
pName |
Full path name of executed scenario (String). |
|
pType |
Scenario type (String). |
|
Initialization |
|
|
NetScenario() |
Constructs a NetScenario object. |
|
NetScenario( string ScenPath ) |
Constructs a NetScenario object and execute specified Scenario or Scenario Group. |
|
Methods |
|
|
Exec( string pScenPath ) |
Executes specified Scenario or Scenario Group. Returns NetScenarioStatus. |
|
int GetResultsCount() |
Returns number of captured strings that is number of stored NetScenarioText objects. |
|
NetScenarioText GetResult( int i ) |
Returns reference to a NetScenarioText object that contains captured string. |
Example of C# application that uses Scenario.NET .
Example of using Scenario.NET in C# application is implemented in ScenarioTestNET application. The key code example is the following
////////////////////////////////////////////////////////////////////////
NetScenario scen = new NetScenario( scenFilePath );
if (scen.Status != NetScenarioStatus.txsOK)
{
string strErr = “Scenario execution error: ” + scen.Status.ToString();
. . .
return;
}
// access results
string strRes = “Scenario=” + scen.pName + “\r\n”;
strRes += “Scenario Type=” + scen.pType + “\r\n”;
strRes += “Captured Text:\r\n”;
for (int i = 0; i < scen.GetResultsCount(); i++)
{
NetScenarioText result = scen.GetResult( i );
strRes += result.pName + “:\r\n”;
strRes += result.pText + “\r\n”;
}
////////////////////////////////////////////////////////////////////////